Getting Started with Anki
By popular demand, the memory series is back! Thanks to all those who wrote to and asked me if I was going to write more. Over the next few weeks, we’ll be talking about Anki and spaced repetition in depth.
Somehow – I really don’t know how – it’s been a year and a half since the last post, which talked about how spaced repetition works. In this post, I’ll explain how you can get started with my favorite SRS (spaced-repetition system), Anki, and see how it works for yourself.
Preamble on SRS software choices
Anki is not by any means the only SRS available, or even the only good one. Two of the most popular competitors – both solid tools – are Mnemosyne and SuperMemo. There are also many more purpose-driven and subject-specific learning apps that use the principles of spaced repetition but hide the details from you; while these are great if you’re just trying to learn that specific thing, they don’t give you the tools to take control of your own learning across every part of your life, so they don’t fit so well with the goals of this series.
I find that Anki hits the right balance between too simple (Mnemosyne) and too complex (SuperMemo), and it also supports the widest variety of devices (Windows, Mac, Linux, iPhone, Android, and a somewhat bare-bones browser client). As I have mentioned in passing before, however, I am biased; I was employed part-time by the Anki project for five years, have contributed to Anki’s core code and written a variety of plugins, and have been a user and part of the community for going on ten years now – so while I obviously know my stuff where the platform is concerned, if you’re really focused on getting the best tool for you, you might want to do some of your own research.
That said, getting the best tool is really not that important. As long as your tool supports the basic concepts and scheduling math I describe in this series, it will work just fine. If you don’t like Anki for whatever reason, or you’re already familiar with another tool, most of what I present in this series will apply to any SRS of your choosing; you just won’t be able to use the instructions I provide verbatim. I cannot imagine any situation in which using Mnemosyne instead of Anki (or vice versa) could sink your spaced-repetition project.
Installing Anki
While there are web and mobile versions of Anki, you want to start with the PC version – it’s the easiest for setting things up and for editing your cards, and there are a few things you can only do on the PC version, particularly when it comes to add-ons, so you should always have it available. Download and install the version appropriate for your operating system from https://apps.ankiweb.net/ – generally you just click the big blue “Download” buttons, but occasionally you may be presented with a choice between two versions, in which case you’ll want to pick the newer one. Once you’re installed, start up Anki; you’ll be prompted to pick an interface language, and then you’ll see the main screen.
Generally, Anki’s default settings are quite sane, but I do suggest making one change: in the Preferences dialog, on the Tools menu on Windows and Linux and on the Anki menu on Mac, I recommend enabling the Anki 2.1 scheduler on the Scheduling tab. While it says “beta,” it’s been stable for quite a while, and it eliminates some minor annoyances with the previous scheduler. When you close the dialog box after enabling this scheduler, you’ll get two scary warnings. Since you don’t have any content or review history in Anki yet, these don’t matter to you – just click Yes to each.
Adding material
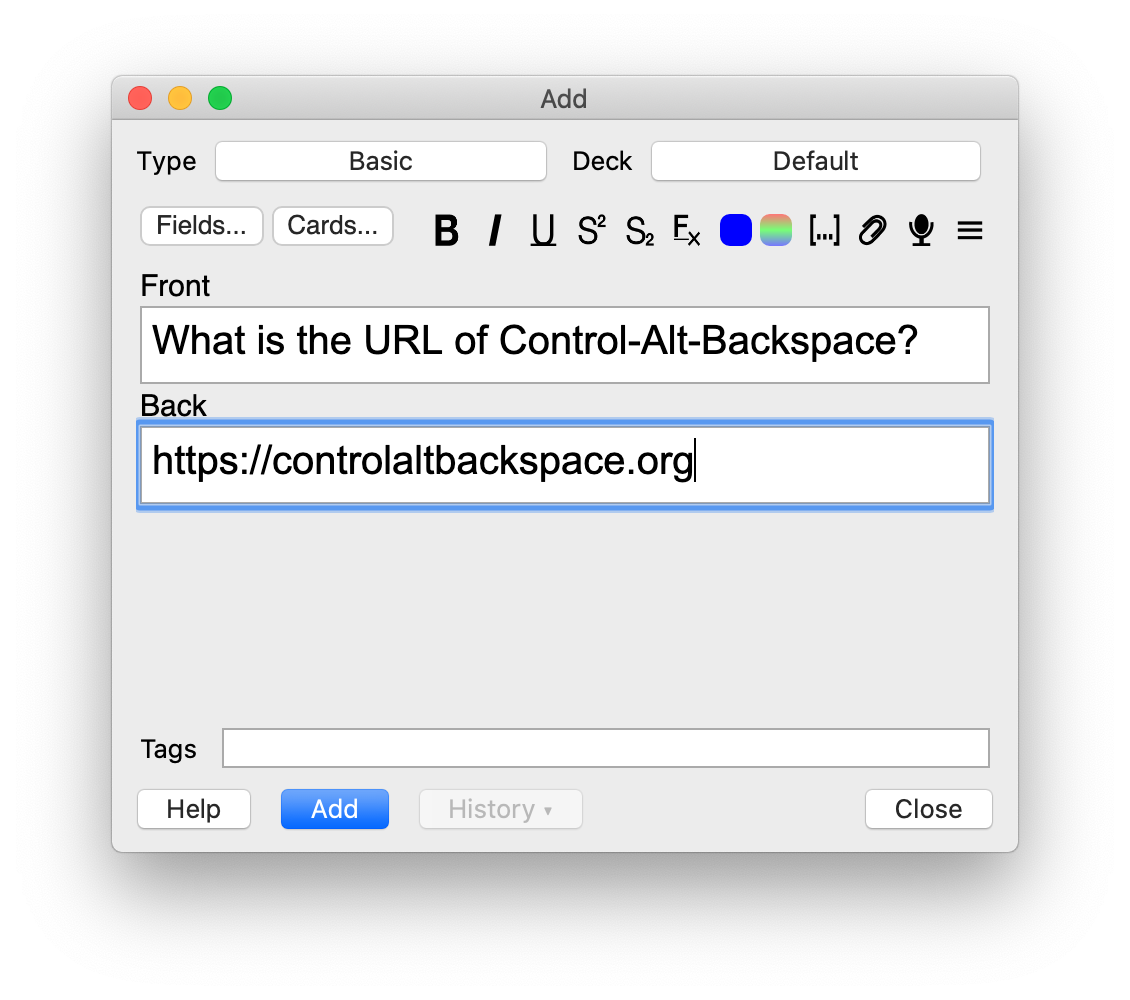
Let’s try adding a card! Click the Add link at the top of the screen or press a on the keyboard; the add window will appear. Make sure that Basic is selected next to Type in the upper-left; we’ll talk about note types later. Put a prompt into the Front field and an answer into the Back field; for example, “What is the URL of Control-Alt-Backspace?” / “https://controlaltbackspace.org”. Click Add or press Ctrl-Enter (Command-Enter on a Mac) to add the card.
Tip: If you make a mistake while adding a card, click the History button to quickly get back to what you just entered and fix it.
Reviewing material
Once you have some cards, you’ll want to review them – that’s the whole point of spaced repetition, after all. If you close the add window, you’ll notice that there’s now a small blue 1 next to the Default deck, indicating that you have 1 new card to study today. If you click on the deck, you’ll see a bit more information about what’s due today. Click Study now to get started.
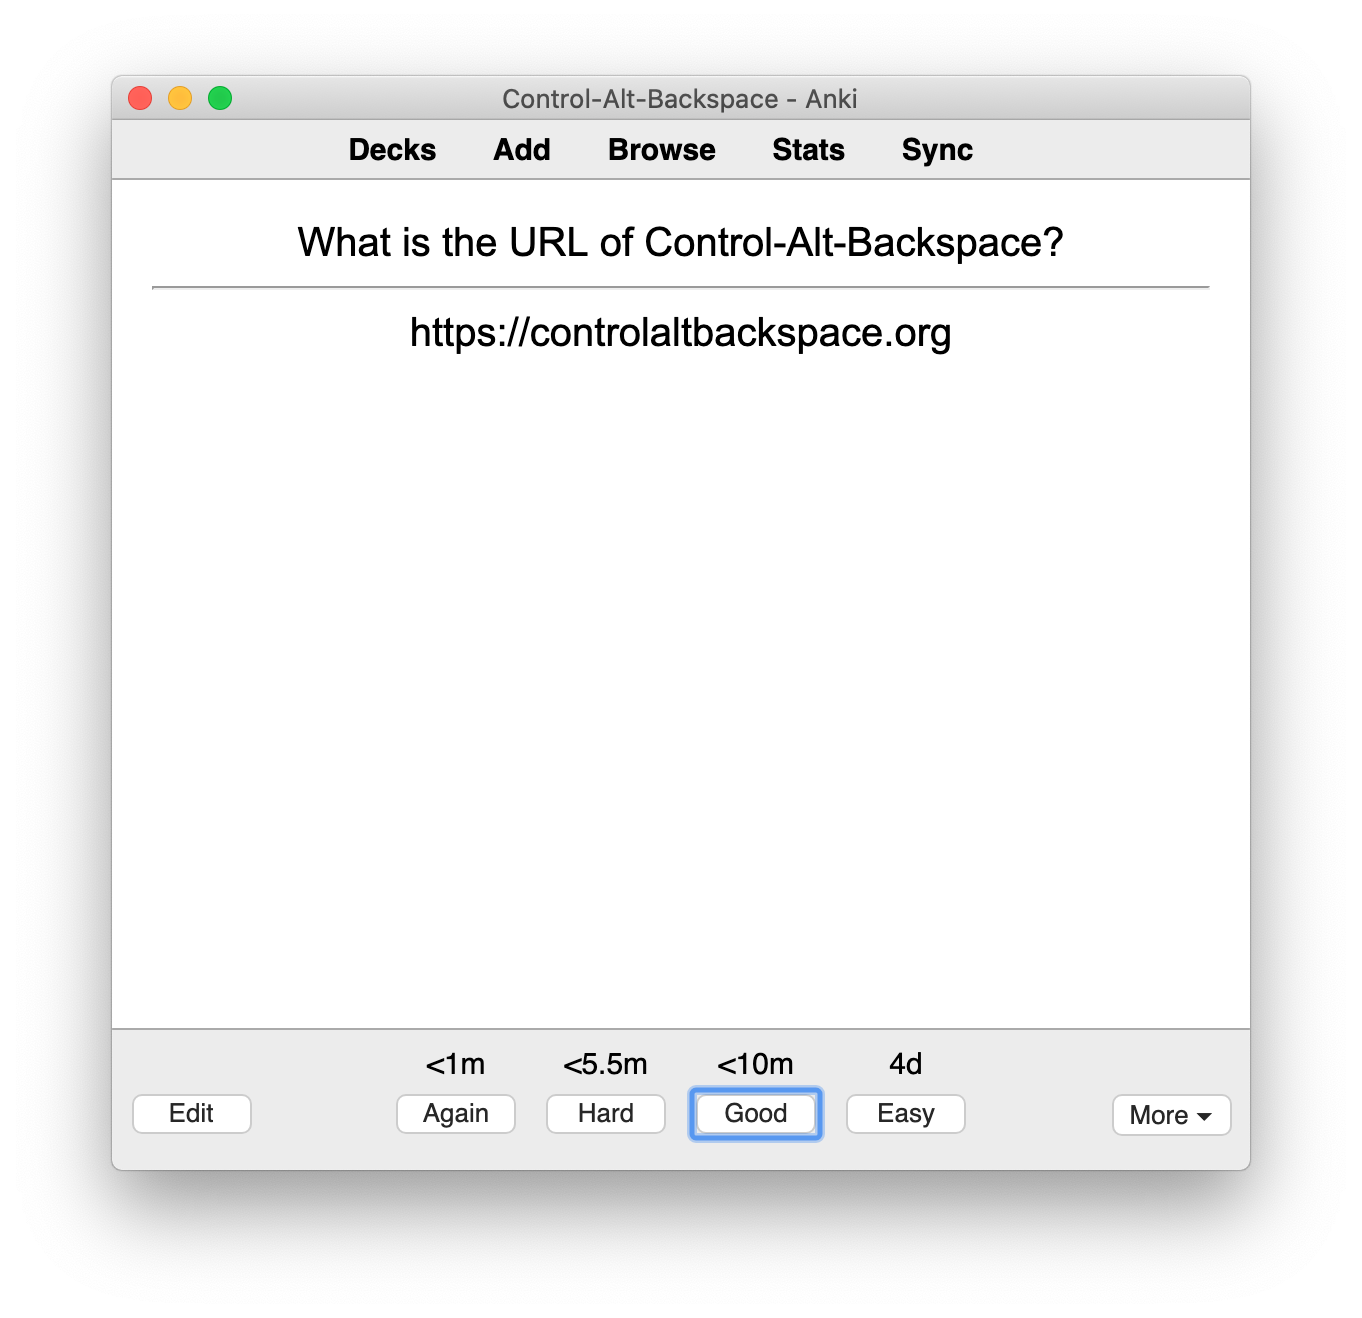
You’ll see the question you just added
presented to you at the top of the screen;
say the answer to yourself and then click Show answer to check it.
The Show answer button will be replaced
by four rating buttons: Again, Hard, Good, and Easy.
(If you didn’t enable the Anki 2.1 scheduler,
you’ll see only three for this card, for complicated reasons
– one of the benefits of the new scheduler.)
You’ll also see an estimate of the new interval of your card
(the amount of time until you see it again)
above the buttons: m stands for minutes, while d stands for days.
Later on, you’ll see mo and y for months and years, too.
Your task now is to decide how well you knew the answer to this card and click the appropriate rating button. I described the function of each rating in Spaced Repetition from the Ground Up like this:
- Again: I did not remember the answer to this card. I need to try again soon.
- Hard: I remembered the answer to this card, but only with great difficulty. The interval was too long and should increase less this time.
- Good: I remembered the answer to this card, and I had to think a little but not too hard. The interval was about right.
- Easy: I remembered the answer to this card easily. The interval was too short and should increase more this time.
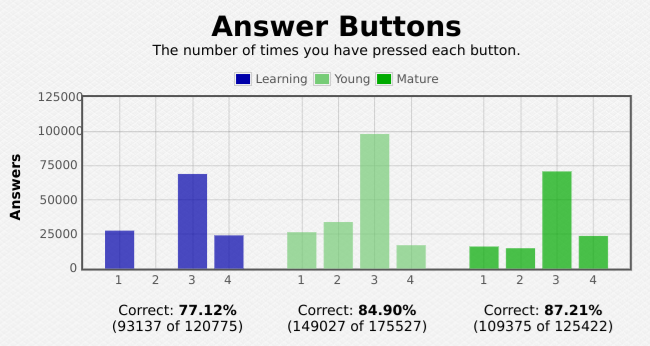
Providing an instantaneous self-assessment can be awkward and difficult at first, but within a few days, you’ll stop thinking about it. In the meantime, don’t overthink it – the worst that will happen if you pick “wrong” is that you’ll spend a tiny amount of extra time studying. If you’re ever unsure what to pick, pick Good, which is normally the most common response; see for instance my lifetime history of rating-button presses, where 3 represents Good:
You might find that reviewing in Anki is harder than normal study. This means it’s working – Anki’s goal is to show you mostly the material you’re struggling with and the material you’re most likely to forget, so it will feel harder than an average study session where you study hard and easy material in more equal amounts. However, the difficulty and the number of cards you appear to be forgetting might make you feel like it’s not working. Give spaced repetition a few weeks and see how well you remember your content then; that’s the only way to really know how well it’s going. (This phenomenon is well-known and has a name, desirable difficulty.)
Once you’ve reviewed and rated all the new cards and review cards scheduled for the day, you’ll get a “Congratulations!” screen, and you’re done studying until tomorrow. Clicking Decks in the top toolbar or pressing d will take you back to the main screen.
Tip: Reviewing in desktop Anki using the mouse to point and click becomes almost intolerably annoying after a couple of minutes, so unless you’re using a laptop with a touch screen, you’ll want to learn the basic keyboard shortcuts right away. Hitting the spacebar activates “show answer”, and you can select the ease buttons with the numbers 1 through 4.
Browsing material
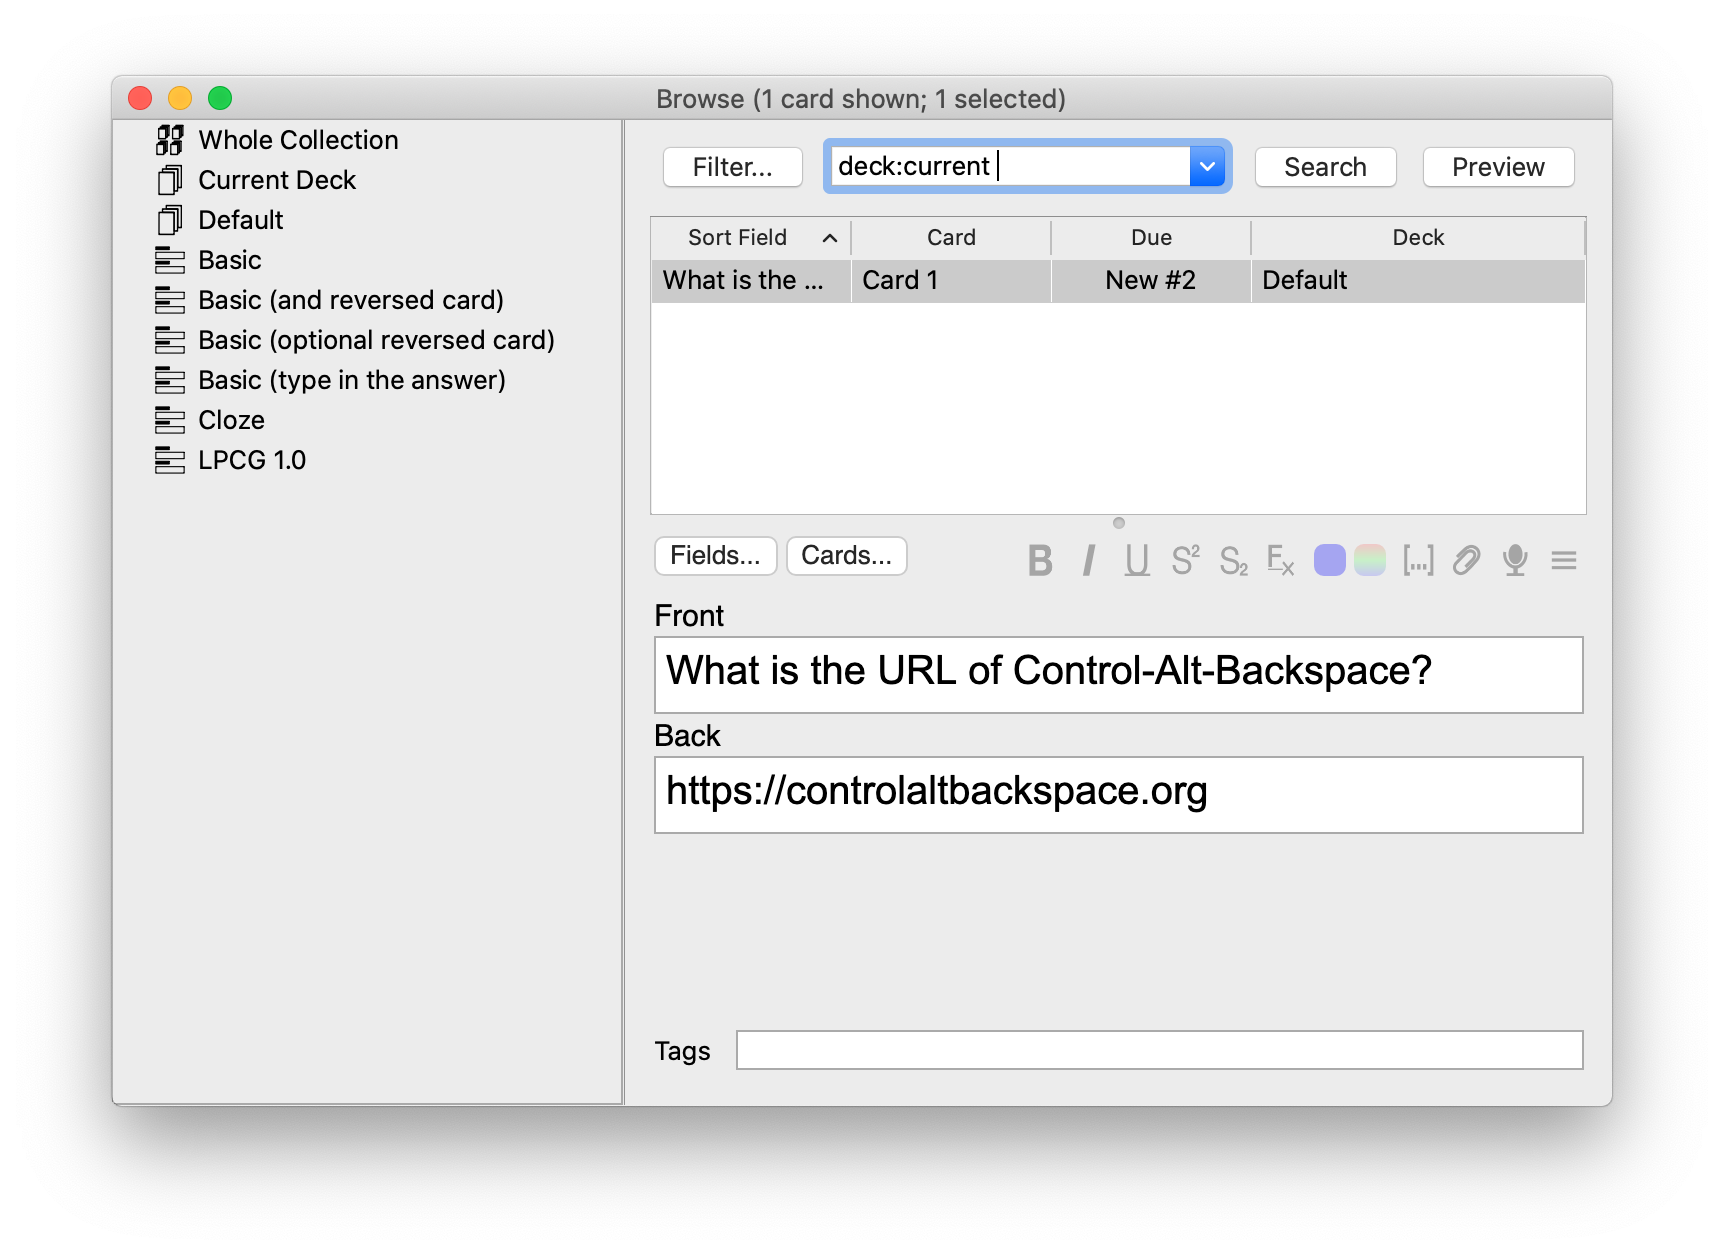
The last of Anki’s three main windows is the browser (not to be confused with a web browser like Chrome or Firefox). This lets you search for, edit, reorganize, and make high-level study-strategy decisions about content you’ve already added. To open the browser, click the Browse button on the toolbar or press b on the keyboard. If you’re in review mode, you’ll see the current card highlighted; if you press Enter, you’ll see the whole deck. For the moment, you just want to be aware this view exists in case you need to come in and look at your content; you’ll learn the rest as you need it.
More ways of adding material
We saw how to add cards from scratch above. But what if you already have some material you’d like to study? Surely Anki isn’t going to make us copy and paste it into our collection?
There are three broad ways of getting external material into Anki. The first is Anki’s own shared deck system. If you want to learn something formulaic that others have probably studied (e.g., the five hundred most common words in a foreign language, the leaders of your country, the elements of the periodic table), chances are that someone else has already created and shared appropriate cards. Just click Get Shared at the bottom of the decks screen and follow the directions to find, download, and import the material.
Another option is to import from a CSV (comma-separated values) file, which you can create yourself in a spreadsheet or text editor or export from another tool. If you’re unfamiliar with CSV, it’s perhaps the world’s most popular data-interchange format; if you can get your hands on the content you want to put in Anki in some structured form (i.e., divisible into questions and answers, not as a free-form book), chances are you can find a way to turn it into an appropriate CSV. Once you have a CSV file, click Import File at the bottom of the decks screen to tell Anki what file to use and which column of the CSV file maps to which field in Anki.
A third option is to use an add-on. Many specific data sources have popular community add-ons tailor-made for importing content; I maintain two myself, LPCG and TiddlyRemember. You can find and install add-ons much like you install shared decks, starting from Tools -> Add-ons -> Get Add-ons.
A word of warning before you go import-crazy, though: cards you create yourself are invariably better than cards you import, even if the person who shared them is a spaced-repetition expert (which they usually are not). The act of making the cards helps you learn them, plus you won’t be creating any cards that you don’t care about, and you can use personal references on them. Further, importing large quantities of cards often tempts you to try to memorize information you don’t fully understand, which can waste immense amounts of time. That probably sounds like such a dumb idea you would never do it, but it’s so common I guarantee you’ve done it at some point in your life – it’s surprisingly difficult to notice it’s happening.
The more formulaic your cards are, the less you have to worry about these issues and the more useful imported content will be, but in most cases, you’ll get the best results from creating your own cards. We’ll be talking much more about card quality later.
Cautions
Armed with this basic information, you’re ready to start your spaced-repetition journey! A few words of warning first, from my years of supporting Anki and seeing the occasional unfortunate user start off on the wrong foot:
- Study every day, to whatever extent possible. We’ll talk much more about this later, but your review counts can build up to painful levels while you’re gone, and regular study makes a big difference. If you miss a day, don’t panic, but catch up as soon as you can. Consistency beats volume – it’s more useful to add 5 new cards per day but review seven days a week than to add 30 new cards per day but only review two or three days a week.
- Don’t add too many new cards at once. Because you have to continually review information to remember it, when you add new cards, you are locking yourself into paying the review costs later. If you stop adding new cards, your review load will slowly come down as you learn your existing cards better and push them out to larger and larger intervals, but that’s no help if you don’t have enough time to keep up with the load in the short term. Anki defaults to allowing 20 new cards through the gate per day (you can change this by clicking on the gear icon next to your deck and choosing Options); if you do that continuously with cards of average difficulty, you will tend to end up with about 200 reviews per day, which will take 15–20 minutes of daily review to maintain. We’ll talk more about the math in a future post.
- If you don’t know what an option does, don’t change it! Many experienced users like to play around with the parameters of the scheduling algorithm, and I use a couple of non-default settings myself, but when you don’t know much about spaced repetition, changing the parameters has a high chance of wasting an immense amount of study time or (best case) making you really confused about why the system is acting up. Anki’s defaults are all reasonable, so there’s no need to tweak things until you have your feet under you and understand what problem you’re trying to solve.
Learning more
Anki’s manual isn’t light reading, but it’s not overly technical either, and it has the answer to almost any technical question you might have. If Anki becomes an important part of your workflow, eventually you’ll likely want to read the manual cover to cover to get acquainted with everything it can do. This said, don’t worry about learning all of Anki’s features up front; unless you know you need something specific from the start, like the ability to add images or mathematical notation, the features mentioned in this post are enough to get you a long way. The best practices and mental habits and rules for constructing flashcards, which we’ll get into over the next several weeks, are far more important.
The manual also offers several introductory videos and other key concepts in the “Getting Started” section, which are well worth checking out.
If you’re ready to try Anki on your mobile device, or you want to sync your study progress between multiple PCs, click Sync on the toolbar and follow the instructions to sign up for a free account. Smartphones and Anki were made for each other; flashcards fit perfectly on the screen, and having your phone in your pocket means you can squeeze a few highly productive reviews into small spaces. Do be aware that the iPhone app is $25, an unusually high price for an iPhone app because it supports the development of Anki across all platforms. Trust me, the app is worth way more than one or two books in terms of its effect on your life, but if you’ve just started, you might prefer to get used to Anki on the desktop before paying up. (The Android app is free, as it’s maintained by a separate group of volunteers.)
